Except possibly for natural layering, seed is nature’s way of reproducing rhododendrons and the process is not difficult to replicate under human control. One of the benefits of hand pollination for species of known provenance is the maintenance of the gene pool rather than the restriction of variability due to the vegetative replication of named/selected/award winning clones (the favoured status of which may, in any case, be due to some element of hybridity). So, in the interests of “species conservation”, reproduction by seed is the way to go. I shall focus on propagation of species though, of course, the techniques are similar for the creation of hybrids.
What we need is pollen from a plant that is of a clone different from the one that is to produce the seed. Very few species will successfully “self” i.e. produce seed with pollen from a plant genetically identical to the seed parent. Even if apparently viable seed is produced, it may not germinate or the seedlings may die young or produce poor quality plants. A few species will self successfully for some clones e.g Rhododendron schlippenbachii “Sid’s Royal Pink” works quite well. But notice that the offspring are not entitled to be labelled “Sid’s Royal Pink” since they are genetically different from that clone. On the other hand, selfed seed from a particular numbered collection can retain that number since the offspring remain representative of that gene pool.

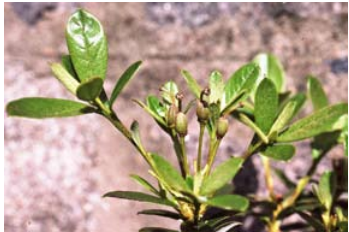
seed production. Those on the right are
too open even to supply pollen
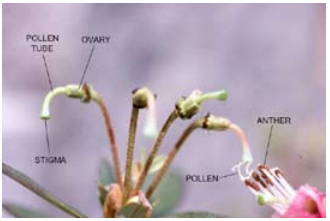
The hand pollination (HP) technique involves replication of the activities of the bees whilst firmly excluding them from the process. The pictures demonstrate the sequence that needs to be followed. The seed parent (in this case Rhododendron charitopes) must have flowers that are not quite open. The petals and anthers must be removed using nimble fingers, scissors or tweezers – whatever works best for you. (Species such as from Section Pogonantha will be particularly challenging for ageing eyes and fingers!) The pollen should come from the anthers of a flower that is also unopened lest a previous bee visit has produced contamination. The pollen will stick readily to the stigma of the seed flower (see photograph). If not, it may be necessary to wait a few days. Occasionally, it is hard to find pollen or the anthers will not release it without some careful squeezing. For beginners, the easiest species are such as the Fortunea subsection which always produce vast amounts of pollen. Repeating pollen application after two or three days is sometimes beneficial. Some people like to wrap the pollinated stigma in foil or sticky tape to guarantee bee exclusion – this is called “controlled pollination” (CP) – but absence of petals and anthers seems to be all that is required to exclude the bees’ interest in that flower. Only a few flowers need be pollinated and, of course, they must be labelled and a pollination diary kept to ensure correct harvesting.
Now we have to hope that there will not be a frost – a problem for early flowering species – and it may be worth trying to contrive some form of protection or you may even have been able to take the plant indoors temporarily. Assuming all is well, the pollen will grow down the pollen tube, the seed pod (ovary) will begin to swell and the seed can be harvested around October. Some species such as Rhododendron brachycarpum, R. macrophyllum, R. pumilum will readily shed seed earlier than this so they must be carefully monitored lest all your hard work is scattered to the winds! The seed pods will generally open in gentle heat in whatever (carefully labelled) paper packets you have used for harvesting but some may need manual intervention although this will produce more chaff which needs to be sieved out. If you have ended up with more seed than you need, the excess can go to the seed exchange or can be kept viable for a few years in a freezer.
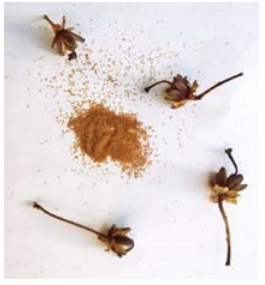
exchange.
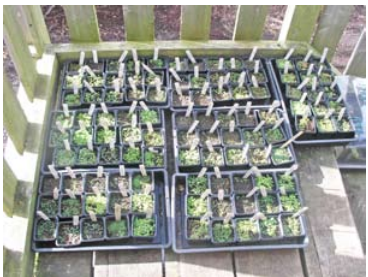
When it comes to sowing the seed, everyone has their own favourite techniques. The usual sowing medium is peat and lime-free sharp sand or vermiculite in some ratio – I use about two thirds finely-sieved peat. In my experience, sowing indoors with bottom heat and overhead lighting can too easily stimulate growth of mould so I always sow outdoors in late May. I use two-inch labelled plastic pots, watered initially from below and covered with fine-mesh plastic shading to protect from both sun and heavy rain. The seed must be sown thinly and evenly and, to assist this, I mix the seed with a small amount of silver sand to help show where the seeds are landing on the medium. A brief gentle spray will help “glue” the seeds to the compost and this can be repeated at intervals as the seeds germinate over the following weeks. If the seedlings show signs of toppling over, a scattering of more silver sand will help anchor them. After a few weeks, you will have an array of riches such as that shown in the final picture; the slats around the decking there allow a good regime of dappled sunlight to reach the young plants and application by spray of very dilute liquid fertiliser will encourage good growth before autumn sets in. The following spring, pricking out into individual pots or into communal trays with some slow release fertiliser will complete the propagation process.